Tuesday, June 14, 2011

Zooey Deschanel's Dress : "She & Hem"


Dear Zooey Deschanel, We're gonna make your dress! Here's how :

First, get all celebrity crushy and collect as many photos of different angles of Zooey in this dress as we can possibly find on the internet. This random directory I found was pretty helpful. The first photo I found of this dress was the above which had been colorized. But I really love that vibrant green, even though the actual dress is blue.

Next I collage the best views with a simplified sketch, which I make in Illustrator.


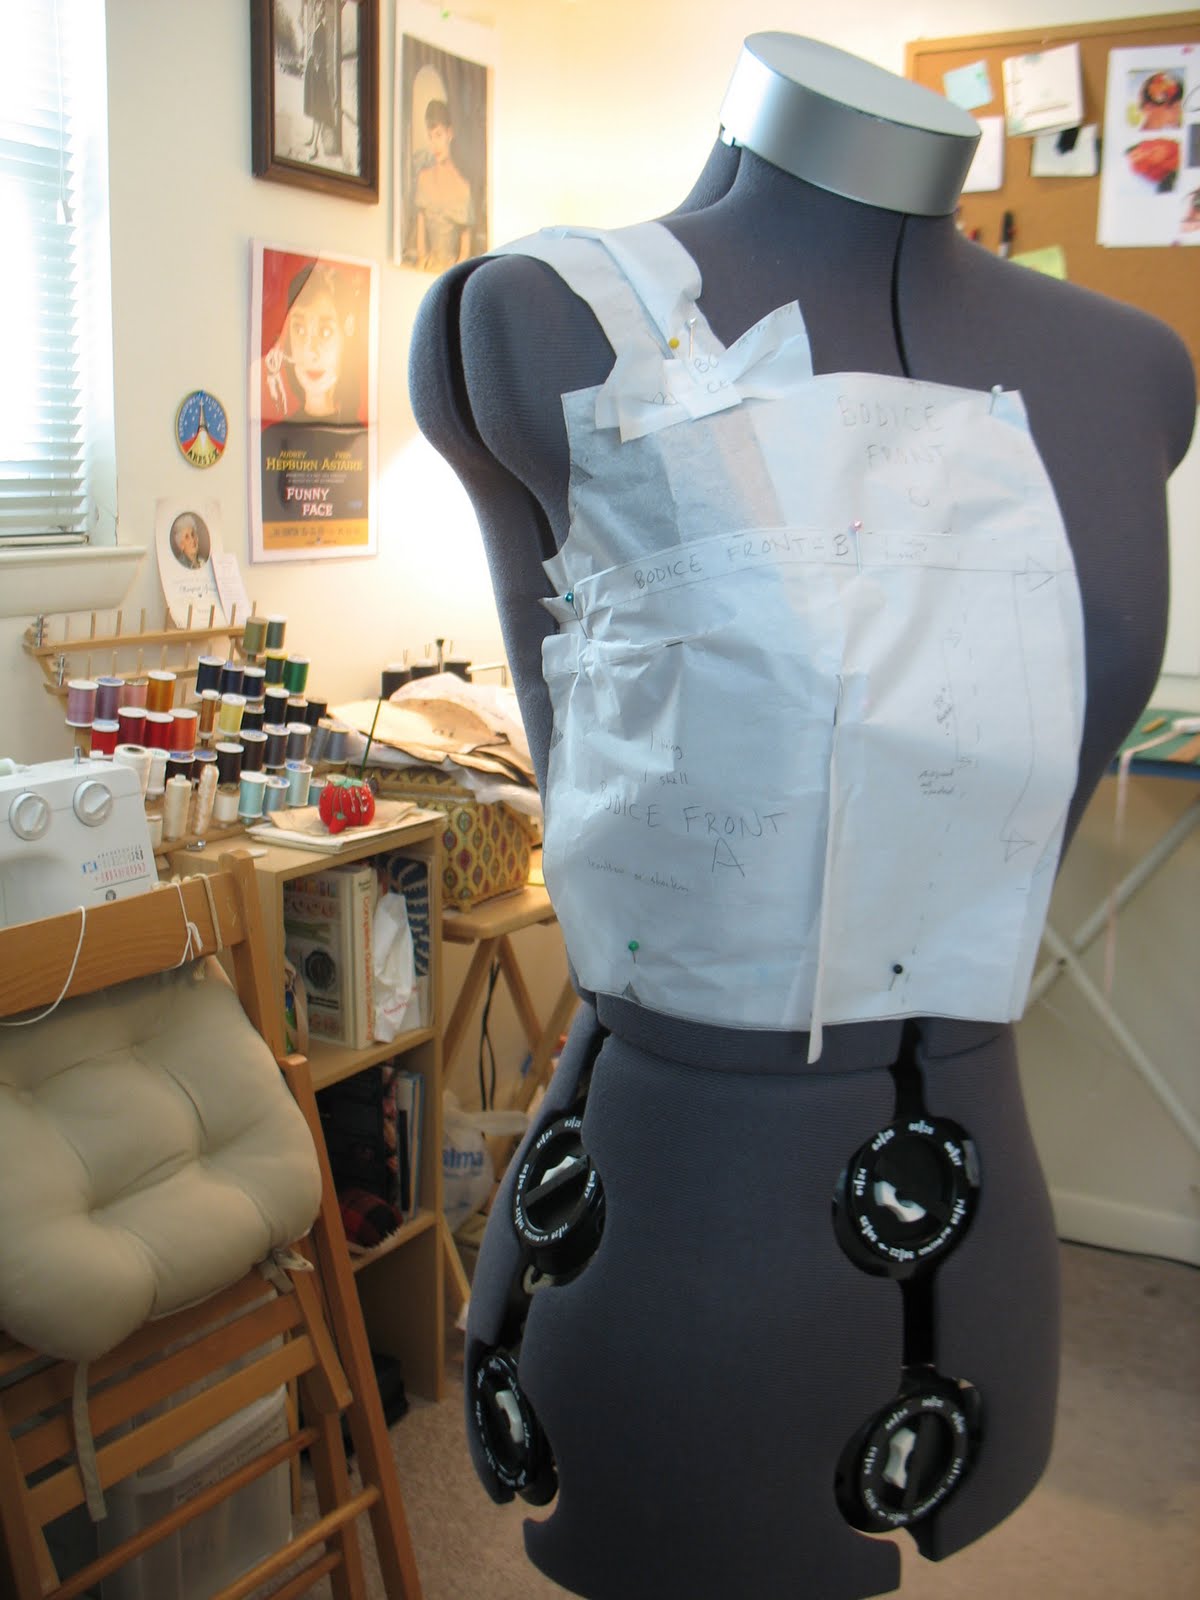
I started with a pre-made bodice pattern I had already for the general shape and size, and edited it to fit the shapes of the bodice pieces in my illustration. I like to fit the tissue paper pieces to the dress form to make sure my shapes are drawn & measured correctly.

This is a process of many edits ;•)


Here are all the bodice pieces pinned to the form, mostly ready to go.


All completed pattern pieces are laid out.
And I made my first pattern envelope to store them all in!


All the pieces have been laid out on the fabric and cut out.
(I ended up not using the pocket for this first-time prototype).


There are 3 layers of bodice that get a bunch of darts in them. I think next time around I'd like to come up with a way to simplify this step, and reduce the amount of bodice thickness.


Here's the inner-most part of the bodice with the gathered edge, sandwiching the shoulder straps. The gather is made very loose because if it's too tight, it alters the shape of the bodice in ways we do not desire :•)


Now the skirt gets attached to the bodice. I like using pleats. It gives a slimmer waist effect, and allows you to more easily cinch the bodice to the skirt perfectly.


Almost done! The zipper and then the hem are the last steps.


And here's "She & Hem" completed!


She can be custom-ordered here.


Wednesday, June 8, 2011

Jellies!

Remember jelly shoes?


I had a pair of these colorful plastic/rubber shoes when I was little. I always loved the dainty tapping sound they made when you walk in them.

My husband and I were shopping for shoes for him last night and I found a pair of Jelly shoes, for adults! I was pretty excited! *childhood revisited* They look similar to these below (only more clear/less silver) and they have a cotton sole so your feet don't get sweaty :

A coworker complimented them on me today, which brought up a Jellies discussion about how much we love them. I looked them up at various online spots, and didn't realize how many Jelly styles there are! There's a Brazilian company called Melissa that makes a bunch of them, too.


Here's some more!


They're like cartoon shoes! I'd love to visit a Jelly factory and watch how they make them. I hope their logo is a jellyfish wearing shoes, too. Wouldn't it be fun to be a Jelly shoe designer?


Melissa Plastic Dreams is one of the jellies they discuss in this video, designed by a Brazilian architect. Vivienne Westwood is another jelly designer, for the more "punky European" style.

I've been planning to make some shoes in the near future... not of "jelly", but fabric. I think it would be a desirable accessory to sell in the shop. Plus I have the same sentiment about shoes for sale these days that I do about clothing : I can never find what I truly love and want to wear! ... except for these jellies :•)


Tuesday, May 17, 2011

May The Plush Be With You!

I get absolutely ecstatic when people have baby showers, and those people are way into something as nerdy as I am. Necessity gifts are fine, but a stuffed lightsaber lasts forever! *bzzz!*

The "Baby Lightsaber" is made of dove gray broadcloth adorned with sheer black ribbon for the handle, with hand-embroidered texture details. The laser is a snuggably soft pale blue flannel, doubled up for stronger seams as I imagine in time this toy may receive some brutal sessions of playtime haha.


I'd love to sell this in the shop, but I'm not sure if it would offend Mr. George Lucas. I've seen lightsabers, lightsaber knock-offs and "lazer swords" all over Etsy. Anyone know anything about copyright laws with this stuff? If there are, a lot of people apparently don't know about it, and as far as I can tell, Etsy is fine with it.

Wondering...

Tuesday, May 3, 2011

Curses, Purses!

Sometimes I get the impression that I'm the only one in the world who is incredibly picky about handbags! Is anyone else this way or am I crazy? If so, does it make you hold on to the same too-small, military-issue (similar to this), $15 sling-bag for 5 years? This is my situation.

My in-store shopping experiences only turn up gawdy, ugly, too large, too expensive, bottomless-pit style bags that don't have enough compartments. I need something that's organized enough where if I had a lost tiny item, I could locate it within seconds. I've noticed some women searching for minutes for their cell phone within the bowels of their bags. Bags should not have bowels people! (in my opinion).

To be worth using, a bag has to work 100% for me. If it's too small or too large, it doesn't work. If it doesn't have enough pockets, it doesn't work. If it falls in my way when I'm bending down to grab things, it doesn't work. If I can't find a tiny object within it immediately, it doesn't work.

So far there is no place that I have found to stock this imaginary "perfect" bag that I need to keep my stuff organized exactly how I'd like it. Maybe I don't fit the demographic for purse designers these days, I don't know. But I'd like to solve this, perhaps with a new design of my own, which I'm working on plans for. Here's my ideas so far:

Research:
This is the bag style I've made so far, the Purse de Leon. It's sort of a combo cross-body sling + backpack style. Issue: For me, this doesn't have enough compartments or much room to add them. I do like it's flat, out of the way functionality but am not sure about the shape of it for my personal preference.
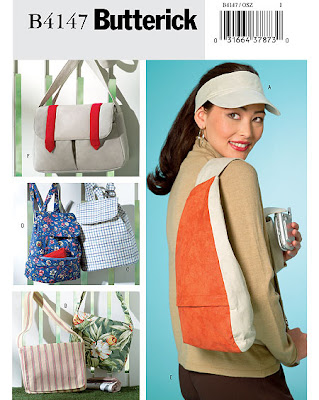
Then I found this pattern (view D, the largest image, ignore the ugly visor) for a more symmetrical bag shape, in comparison to the Purse de Leon's shape. Issue: This bag only has 2 main pockets + one for a cell phone, and even less room to add more.

I found this "baggallini hugger backpack" at Ebags.com and considered its usefulness. More pockets = good. Issue: The shape of this one is starting to look more backpack-like, which is something I'd like to avoid. For some reason backpack purses always seem to have a pretty dated look, and I hate the top loop.
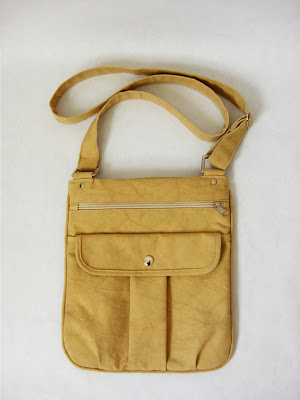
I like the squarer shape of this one from Elenachiesa's Etsy shop and the pleats on the front pocket are nice, although it only has at least 2 pockets. Issue: This one is too flat. From a side-view, you'd see that you wouldn't be able to fit many items in this bag.
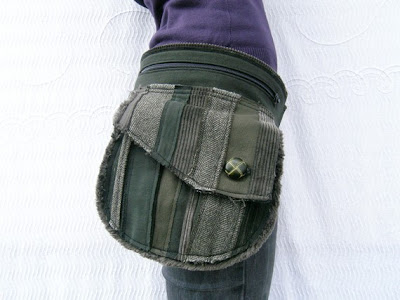
Remember "belly bags"? Now they're calling them "hip bags". This one from Nomadum's Etsy shop is kind of interesting. Issue: This would not work with all outfits, especially in the winter. It wouldn't fit over any longer coat, and you'd have to rummage under your coat to access it.


My Personal Bag Requirements:
• Must contain at least 5 variously sized compartments (exterior compartment for a pen + sunglasses, one for cell phone + ipod and other small things, an interior pocket for personal items, a main interior pocket for wallet and other larger items, and finally another outer pocket for project notes, notebooks, business cards, etc.)
• A 6th compartment for odd items that aren't used a lot but come in handy now and then would be nice too: small scissors, measuring tape, sewing repair kit, etc.
• Must be cross-body style. Shoulder and hand bags are not functional for me, they fall in my way. I often carry a lot of other things and my bag should be 100% hands-free.

*Observation* : I've noticed that the more compartments you have for specific groupings of items, the less beat up those items tend to get. If everything is in one bottomless pit of a bag, the more beat up they will become as they collide against everything else in your bag.

Other Issues:
With all the listed stipulations in mind, I'd like to design a bag that does not need to change with the season or the event necessarily. This is the greatest challenge. It needs to be simple, in an all year round color, and a color and style that I could wear with almost any outfit, excluding ballgown attire of course. Mostly casual. But I don't like changing my bag monthly to fit the season - this is excessive to me.

Should it be more combo sling + backpack style? Or more messenger baggish, but cuter?

So yes indeed. This is a great task. I wonder how many other women are purse weirdos (who find it difficult to sacrifice function for fashion) like myself? And if they'd be interested in the solution that's forming in my mind?

I'd love to hear any feedback you may have!

Monday, April 25, 2011

Zooey Envy

I've been listening to a lot of She & Him lately { Zooey Deschanel + M. Ward }. It's one of my favorite soundtracks for sewing projects. They have a fun upbeat 1960s girl band sound. It's inspiring, as Ms. Deschanel's adorable attire choices embody many of the style aspects I strive for in my work. This is something I hadn't realized until I was recently reminded by the lovely Christina Bowles at Fern Frisbie. Thanks Christina!

So I went into minimal obsession mode searching for Zooey dresses, collecting Zooey photos and watching Zooey videos to see her wearing all those cute outfits.

I love this satin + lace champaigny lavender dress.
It's modest but the lace adds quite a sexy angle to it.

What a cute swim suit! I love the hip-bow + lace.
Might be best on a sunning babe than a very active swimmer though.


Green with envy!
Add to "to-sew" list: Check.


My research method usually consists of lots and lots of image research, and then some pattern browsing to see which ones can be pieced together to create new things. But the most helpful step in construction assessment is making simple sketches like this one. Zooey's little green dress caught my eye indeed. The busty layers are interesting and attractive yet modest, and the little bows are a nice playful detail. I suddenly want this green dress! { and to grow my hair and bangs out a little bit! }

Ahhh, sketching what I can one day create is how I compensate for not being home sewing in my little corner for the majority of my time while I'm day-jobbing as a web designer. *sigh*

Friday, April 15, 2011

My 'Sabrina' Inspired Wedding Dress

Almost 2 years ago around this time, I was completing the finishing touches on my very first handmade wedding gown before the wedding in May. It turned out wonderfully! I was so happy with it. And even better, I learned a lot.

This project underwent many stages of planning and assembly, which I'd like to share with you today...

First of all, I started thinking about what I wanted my wedding dress to be way before I knew I was getting married, or before my husband and I really even knew each other! I did a ton of research. I knew I wanted a vintage, classic feel. I spent many hours browsing through patterns to get ideas for what I could piece together to fit my vision. The two icons always present in my mind during my planning stages were Grace Kelly's wedding gown and Audrey Hepburn's ball gown from the movie Sabrina.


I adore Grace's delicate lace and modest silhouette, and I just had to have Sabrina's train! I wasn't sure how I was going to do this at first, and I put off figuring that out until I had the dress itself together. So here goes... (click on any of the photos for larger views)

I chose the center style of this pattern for the basic shape of my dress, with some edits and additions.

Here I am laying out my fabrics. I found a beautiful ivory satin and dotted lace from Jackman Fabrics in St. Louis for the overlay. I changed the neckline into the sweetheart shape rather than a straight boatneck.

I liked that this pattern didn't have a seam between the bodice and the skirt.. Here's a view of making the darts in the waist-to-skirt section, and the sweetheart neck on the right. The underbust puckers are also a nice detail.

My first dress try-on, as I hold the back together without a zipper installed.


This is my first train version, which I did NOT like at all. It reminded me of a little girl's dress, my flower girl's to be exact. I tried a pleated top, lace-lined shorter train that just felt really weird and kind of cheap. Not cool!

Upon much further research, I was ecstatically relieved to discover this website that basically details out the shapes and assembly for the Sabrina train! Holy moly: this was all coming together so wonderfully now! So I made a trip to Gail K Fabrics in Atlanta, GA for this amazing lace. It would work perfectly!

Sometimes you just have discover "off the wall" solutions for things. The lace piece was very wide, so I borrowed a projector from work to display the pattern of the train onto the wall in actual size (since all I had for the pattern was the tiny illustration from that site above).

Here is the entire lace part of the train after gathering the top portion. I bought some extra satin and laid it out under the lace so I could cut the satin to fit the shape of the gathered lace. The two top curved portions that look like bat wings will get sewn together, as with the satin, creating the center back seam of the train, which lays against the back of the dress skirt so the seam is never seen.

Here's the train with the center back seam sewn, just gathered at the top and pinned to the back of the dress. Notice how un-full the train appears at this point. What to do!?

At this point in my sewing skills (2 years ago), I wasn't sure if I could achieve making crinoline layers to fill that train as much as I envisioned. So I went to David's Bridal and bought a very full crinoline skirt to stuff all up in there. It worked like a charm.


I used the extra lace floral pieces to create an embroidered texture around the hem. I always really enjoy sewing on these kinds of details. It's very tedious, but relaxing somehow.


Here's the front view with train pinned on and embroidered details done at the hem. This was one of those moments where I felt like I had just accomplished so much so far! I just wanted to stare at it and smile. It became this presence in my room. I felt like it deserved me giving it a "goodnight" blessing before going to bed that night.

Next, this dress needs a dust ruffle! This part is black on Sabrina's dress. It keeps the lace from dragging on the floor. I used an ivory chiffon. A very long, ruffled piece was needed to fit around the entirety of the train hem. With all the ruffles and the length of it, my gathering thread kept breaking or I'd lose the ends to pull up within the gathers ~ frustrating!

Once I got over myself and got it done, the ruffle was sewn to the satin part of the train only, so the lace could lay over the ruffle. I soon discovered that the lace would need to be tacked into place so they would remain aligned properly with wear.


Here's the train hem, post-lace-tacking. Perfect!

...and the view from the back. The zipper is installed at this point but the dress form I bought after starting this project was too large for me, so it didn't zip up totally in the back. Later, I would apply 42 covered buttons to give some elegance to the zipper back there.

Now it needs a belt to go over the fraying top of the gathered lace train. You can see part of the top of the crinoline that I stuffed into there for train fullness too (the bright white bit). That must be covered!


So I designed a little belt-topper to enclose those loose ends. Here's my belt piece and sketched plans for it. Later I would also take more of the smaller floral embroidered bits to embellish this belt piece with.

This dang train is getting quite heavy now with all those layers and the crinoline. I bought heavy duty hook and eyes (4 of them) to affix across the back of the dress and the top of the belt. I added more floral embroidered pieces around the hooks so that when I wore the dress without the train, the hooks would not be seen.

And now for some working hard shots:

Sewing those dang ruffles on!

I also made my veil. Organza gathered at the top and sewn to a comb. In this photo I'm cutting the lace edging from my train remnants to use on the edge of my veil.

And here I'm sewing on the veil edging while watching House.
Veils are fun, and much less stressful than mile-long ruffle hems.

It's done!

Mr. & Mrs. on our wedding day!

I highly enjoyed this project, but was greatly challenged by many things that I would do differently had I the chance to re-make the gown today. I spent about 5-6 months pre-planning and planning and traveling for materials and sewing it all up in small increments.

It was definitely worth the effort! (and the literal blood, sweat and tears) that went into this creation. I know I never would have found anything like it anywhere else on the planet and I'm extremely satisfied with the fact that I could create it perfectly for myself.

The Sabrina Inspired Wedding Dress design is available for custom order in the shop
, as I would love to give anyone else the same opportunity to enjoy this gown as I have.

Wedding dresses are especially dear to my creative heart lately. I do indeed plan to create more and more of them in the near future!


Tuesday, March 29, 2011

Mastering Princess Seams

The Problem: Princess seams, or any curved seam will have an outside and an inside curve (shown in red below). The outside curve is sharper as it allows the fabric to fit the curves of the bust. These seams will tend to pucker when sewn, as they do not match in length. But here’s the trick to achieve a perfectly un-bunchy curved seam every time...


Stay-stitch all curved edges of the bodice side fronts and the bodice front, about 1/2” from the cut edge. In the end, this stitching will be inside the final seam so you won’t see it from the outside.


Clip the seam allowances along all the curved sides, right to the stay-stitching. Make the clips every 3/8” to 1/2”. This will help the fabric spread so as to match the curve of the other peice without bunching up.


Starting at the bottom of the seam, pin the two pieces, right sides together, keeping the pins on the outside of the stay-stitching.


Sew the peices together at 5/8” seam.


Press the seams open on a pressing ham from the inside. To further reduce bunching, notch “V” shapes into the seam allowance as shown.


And you’re done! With perfect, un-bunchy princess seams!